
Install Scylla Core, wire the bootstrap into a scene, and get the framework running and logging in a couple of minutes.
Installation
You install Scylla Core through Unity’s built-in Package Manager, the same way you import any Asset Store package. You need Unity 6.5 (6000.5) or later and a URP project; the framework itself is render-pipeline-neutral, so HDRP works too for the modules that touch rendering.
- Open your project and choose Window > Package Manager.
- Switch the Packages dropdown at the top-left to My Assets.
- Sign in with the Unity account you used to buy Scylla Core, if you are not already signed in.
- Find Scylla Core in the list. If you do not see it, click Refresh (the circular arrow, top-right).
- Select it, click Download, then Import. Leave everything checked in the import dialog and click Import again.
- Wait for Unity to finish importing and compiling.
Scylla installs as a package, not as a folder of project assets. When the import finishes you will find it at Packages/com.scylla.core/, not under Assets/, and it shows up in the Package Manager’s In Project list alongside Unity’s own packages.
When the compile finishes, a Scylla entry appears under the Tools menu in the menu bar. That entry is your sign the import landed cleanly: it hosts the Getting Started window, the Setup Wizard, the per-module wizards, and the editor tools.
The Getting Started window
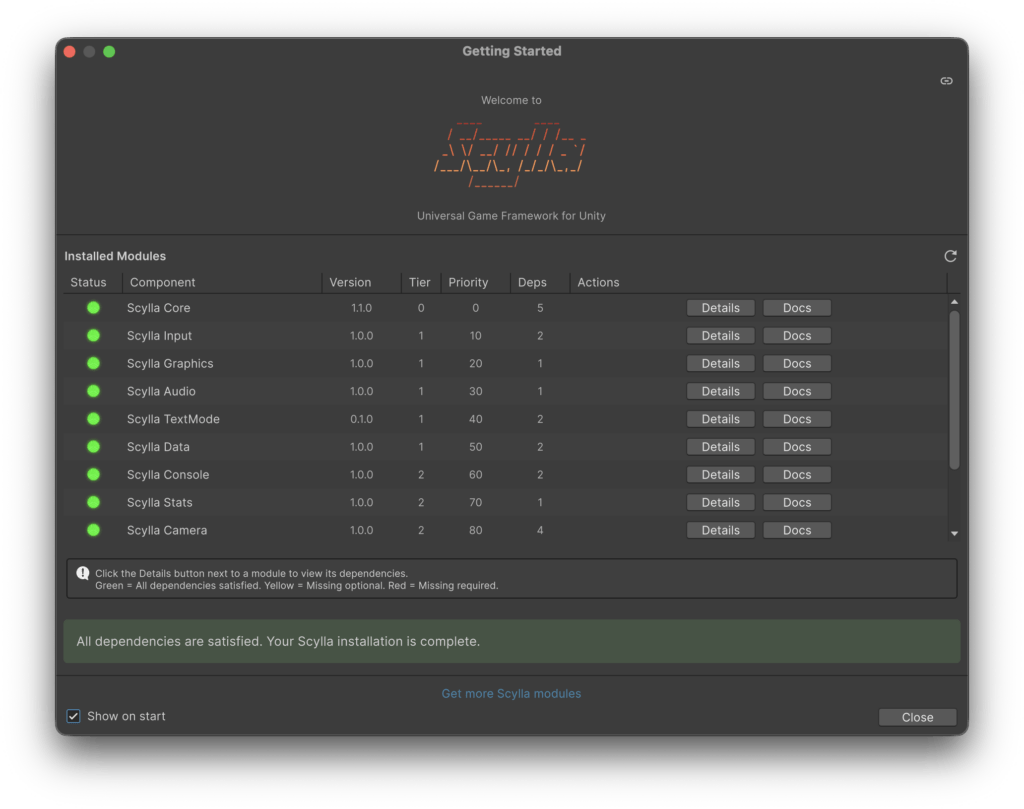
You should not have to go looking for this one. Scylla’s Getting Started window opens by itself the first time the framework lands in a project, and again whenever you add a Scylla module it has not seen before. It never opens while the Editor is in Play mode, and it never opens in batch mode, so it stays out of the way of builds and CI.
If it does not appear, or you dismissed it and want it back, open it from Tools > Scylla > Getting Started… or press Ctrl+Shift+G (Cmd+Shift+G on macOS). A Show on start toggle in the window footer controls whether it reopens once per Editor session; the automatic appearance on a first install or a newly added module ignores that setting.
The window lists Scylla Core and every installed module, so you can confirm at a glance that a package imported cleanly. Editor-only tools such as Chroma do not appear: they are not modules, they take no part in the framework lifecycle, and they have no dependencies to resolve. You reach those from Tools > Scylla > Utilities instead.
Each module gets a row with four buttons:
| Button | What it does |
|---|---|
| Details | Opens the dependency view for that module, listing each package it needs, where the requirement comes from, and whether it is installed, missing, or a version mismatch. Dependencies that are themselves Scylla modules carry their own documentation links here. |
| Docs | Opens the module’s guide pages on the Scylla website. |
| Install Missing | Installs every package the module needs that is not present yet, so you do not have to track them down in the Package Manager one at a time. |
| Install Demos | Imports the module’s sample scenes, and reads Demos Installed once they are in. |
If you also want the demo scenes, select Scylla Core in the Package Manager and import the Demos sample from its Samples tab. Samples are copied into your project rather than run from the package, so they land under Assets/Samples/ where you can open, edit, and delete them freely.
Setup and Configuration
The framework starts from one component, ScyllaBootstrap, that lives on a single GameObject in your first-loaded scene. You can create that by hand, but the Setup Wizard does it for you and registers everything in a single undo step, so you can back out with one Ctrl+Z (Cmd+Z on macOS).
- Open the scene that loads first when your game runs (usually your boot or splash scene).
- Choose Tools > Scylla > Setup Wizard… (
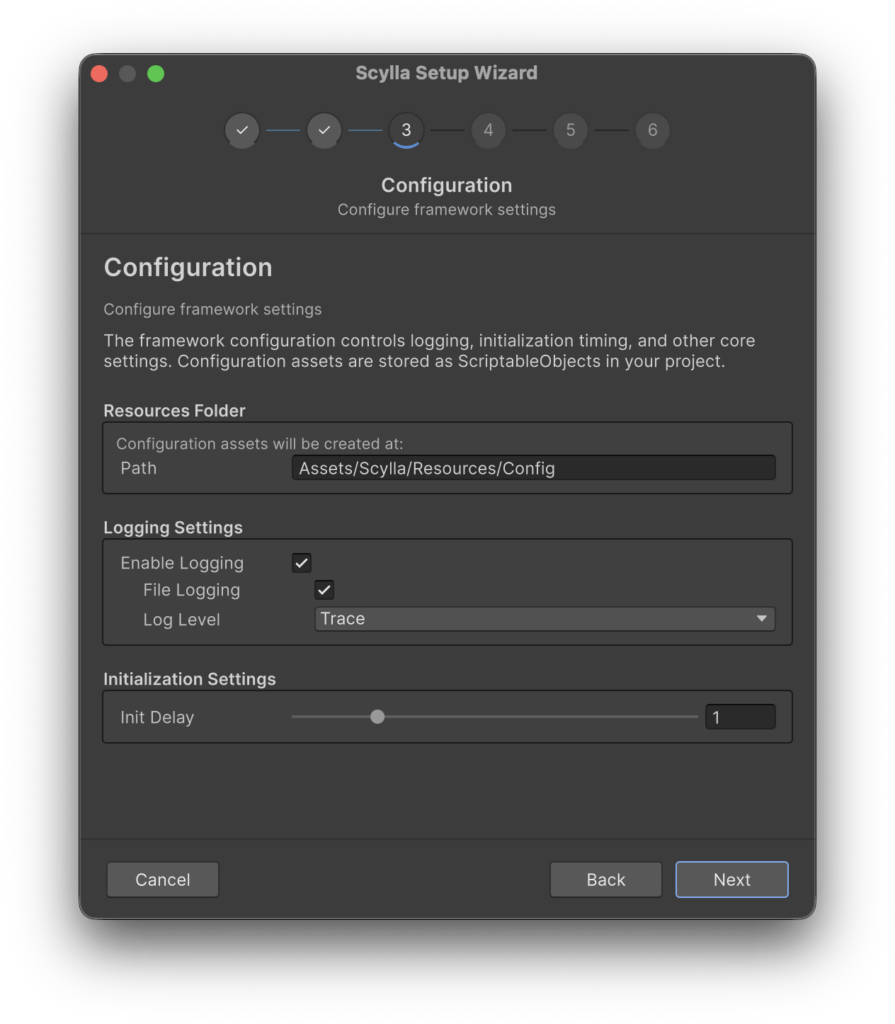
Ctrl+Shift+W, orCmd+Shift+Won macOS). - Step through Welcome, Scylla Core, Configuration, Modules, and Review. The defaults are right for almost every project, so you can click Next through them unless you want to change the Resources path or the initialization delay.
- Click Finish. The wizard creates a GameObject named
Scyllawith theScyllaBootstrapcomponent, plus aScyllaCoreConfigurationasset underAssets/Scylla/Resources/Config/. That folder is the wizard’s default and you can change it on the Configuration step.
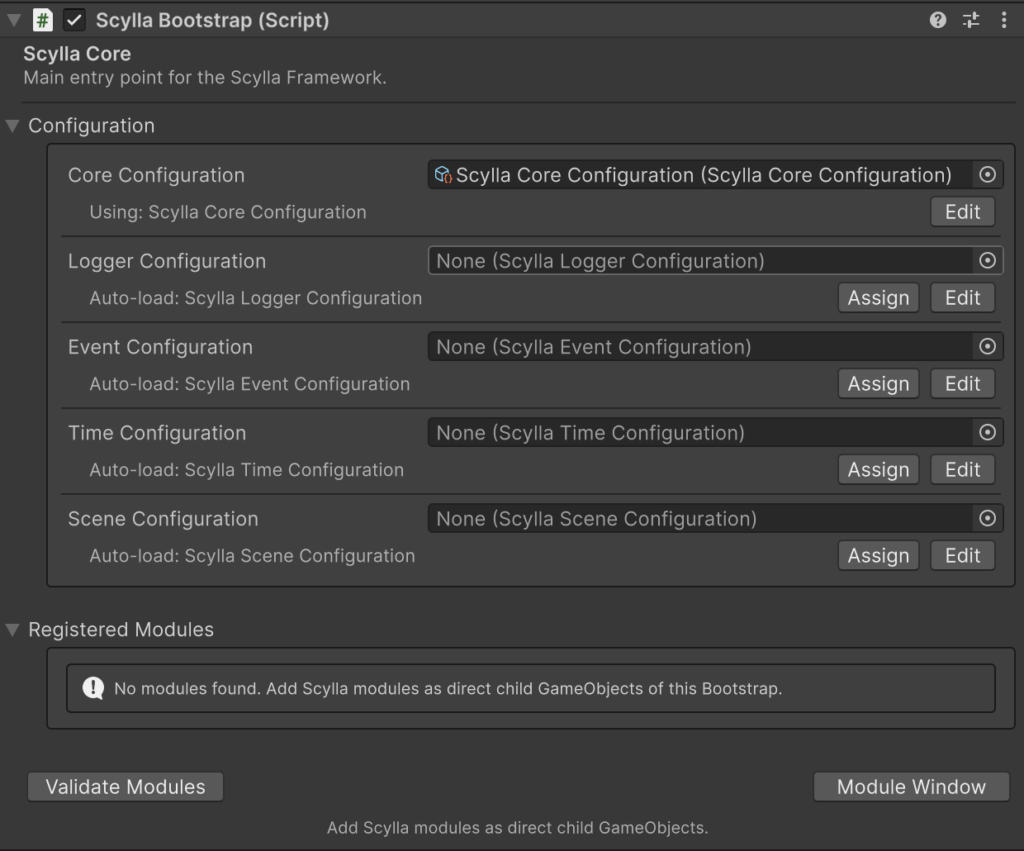
Select the Scylla GameObject and you will see the bootstrap in the Inspector with five configuration slots: Core, Logger, Time, Event, and Scene. Each slot takes an optional ScriptableObject asset. When you leave a slot empty, the framework falls back to a Resources/Config/ asset of the matching name, and failing that to its compiled defaults, so an empty slot is a perfectly good starting point.
When you do want to tune something, the ScyllaCoreConfiguration asset the wizard created is the place to do it. These are the fields you are most likely to touch:
| Field | What it controls | Default |
|---|---|---|
Initialization Delay | Seconds between Awake and the moment your modules initialize. The gap exists so code in Start can register modules dynamically before the framework scans for them. | 1.0 |
Debug Draw Max Commands | Used for the Debug Draw utils. Determines the cap on the per-frame debug-draw command queue. | 4096 |
Every Scylla config asset (the Core one and every module’s) also carries a Config Files foldout that controls whether runtime JSON overrides load. It is a two-level gate, so the runtime only reads an override when both levels agree. The foldout shows a Global group (the framework-wide master switch, which physically lives on the Core configuration) and a per-asset group (just this Core or module config):
| Foldout field | Scope | What it controls | Default |
|---|---|---|---|
Config Files in DBG | Global | Master switch for loading JSON overrides in development builds (Editor and Development Builds). | false |
Config Files in PRD | Global | Master switch for loading JSON overrides in production (non-development) builds. | false |
Config File in DBG | This config | Whether this specific asset reads its JSON override in development builds, once the global switch is on. | true |
Config File in PRD | This config | Whether this specific asset reads its JSON override in production builds, once the global switch is on. | true |
The per-asset switches are on by default, so each config is ready to accept overrides; the global master switches are off by default, so a fresh project ignores JSON entirely until you opt in. To let players edit config files in a shipped game, turn on the Global Config Files in PRD switch; the per-asset Config File in PRD is already on. The configuration asset itself is only the project-defaults layer, and the full two-level gate plus the four-tier fallback (User Documents, Application, Unity asset, compiled defaults) is covered in Configuration.
Run it and read the Console
Press Play. You do not need to write any code yet: the bootstrap brings up logging, time, the event bus, and scene management, then runs every installed module through its lifecycle and prints a short startup sequence to the Console.
The Console is where you confirm the setup actually worked, and it is worth reading rather than skimming. The startup lines tell you which configuration each subsystem resolved, which modules registered, and the order they initialized in. Seeing the sequence reach Framework initialization complete. is the sign that everything is wired correctly.
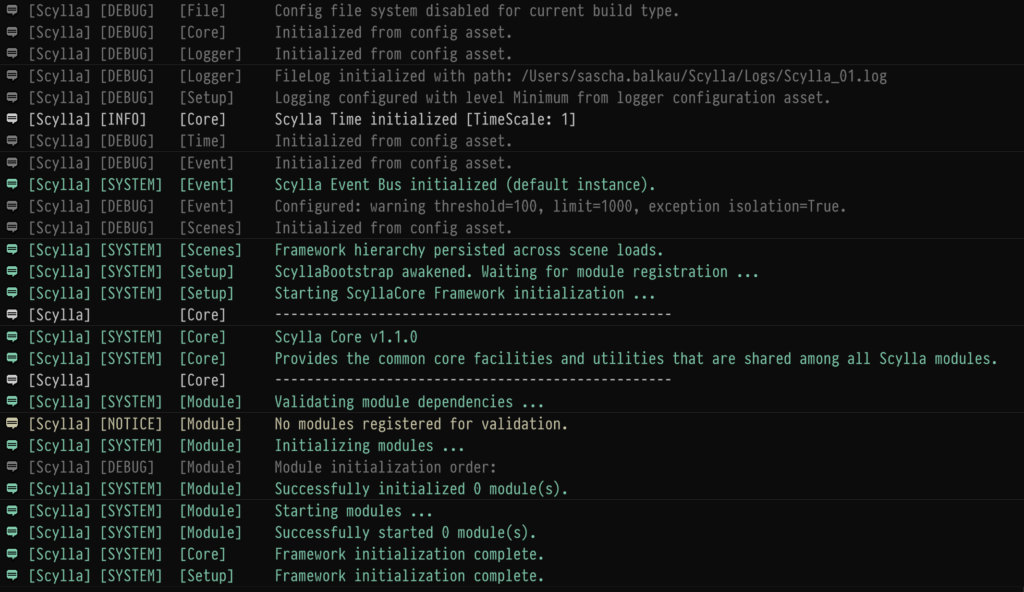
The messages you are looking for, in the order they arrive:
ScyllaBootstrap awakened. Waiting for module registration ...
Starting ScyllaCore Framework initialization ...
--------------------------------------------------------------
Scylla Core v1.2.0
Provides the common core facilities and utilities that are shared among all Scylla modules.
--------------------------------------------------------------
Framework initialization complete.
Each line also carries a prefix before the message: a timestamp, the source file and line, [Scylla], the level label, and the log category. The logger configuration decides which of those actually appear, so match on the message text rather than the shape of the line. Logging covers the switches.
If the sequence stops early or never appears at all, the messages before the gap name the subsystem that failed, and the Troubleshooting section at the end of this page covers the usual causes.
Usage
The handful of things you will reach for on day one are logging, events, pause-aware time, and a safe way to run code once the framework is up. Everything below assumes the framework is running.
Wait for the framework, then run your code
The framework finishes initializing a moment after Start (that is what the initialization delay is for), so you cannot assume it is ready inside your own Awake or Start. Instead, hand your startup code to RunWhenReady. It fires immediately if the framework is already up, or queues your callback for the moment it becomes ready:
using UnityEngine;
using Scylla.Core;
using Scylla.Core.Scenes;

/* Your own game entry-point class: drop it on a GameObject in the boot scene. */
public sealed class GameStartup : MonoBehaviour
{
    private void Start()
    {
        /* RunWhenReady is your safe gate for "do this once the framework is up".
           The optional priority orders multiple ready-handlers; Medium is the default. */
        ScyllaCore.Instance.RunWhenReady(() =>
        {
            /* Every module is fully enabled by the time you get here, so it's
               safe to talk to them and to publish events. This handler is your
               real game startup: kick off the things that needed the framework. */
            Log.Info("Scylla is up", LogCategory.Game);

            /* Now that Scylla is initialized, engage your custom game logic. For
               example leaving a boot scene and bringing up the main menu. Load
               through ScyllaSceneManager so the framework persists across the
               switch and the load runs through the managed pipeline (scene events,
               transition hygiene, progress). See the Scene Manager page. */
            ScyllaSceneManager.Instance.LoadSceneAsync("MainMenu");
        });
    }
}
Log with categories
Route your messages through the static Log instead of Debug.Log. It gives you one call site, multiple sinks (the Unity console and a log file are wired up for you at startup), and a category you can filter on at runtime. Trace and Debug calls compile out of release builds, so you can leave them in.
/* Level plus message. The category shows as a prefix and lets you filter later. */
Log.Info("Player spawned", LogCategory.Game);
Log.Warning("Save file missing, starting fresh", LogCategory.File);

/* Pick the category up front. Switching the receiver to "only errors from Game"
   is one assignment when your categories are consistent. */
Log.FilterLevel = LogLevel.Info;
Send and receive events
When one system needs to tell the rest of the game that something happened (damage taken, checkpoint reached, quest advanced) without caring who is listening, publish an event. Define a class that inherits from ScyllaEvent, publish instances with ScyllaEvents.Publish, and listen with ScyllaEvents.Listen. Here is an example for an event that fires when a player’s health changes:
using Scylla.Core;
using Scylla.Core.Events;

/* Your event type. Add typed, init-only payload fields so the payload is
   effectively immutable once published. */
public sealed class PlayerHealthChangedEvent : ScyllaEvent
{
    public int OldHealth { get; init; }
    public int NewHealth { get; init; }
}

/* Publish from wherever health changes. Every subscriber receives it synchronously. */
ScyllaEvents.Publish(new PlayerHealthChangedEvent { OldHealth = 100, NewHealth = 80 });

/* Listen from anywhere. Store the returned subscription and dispose it when you
   stop listening, or the listener outlives its usefulness. */
ScyllaEventSubscription subscription = ScyllaEvents.Listen<PlayerHealthChangedEvent>(
    subscriber: this,
    handler:    evt => Log.Info($"Health: {evt.OldHealth} -> {evt.NewHealth}", LogCategory.Game));

/* Later, in OnDestroy or OnDisable: */
subscription.Dispose();
Read pause-aware time
Read gameplay time from ScyllaTime instead of UnityEngine.Time. DeltaTime returns 0 while the framework is paused and scales with slow-motion or fast-forward, so pause and time-scale stay correct without you threading a flag through every system. UnscaledDeltaTime keeps running during pause for UI and tooling.
using Scylla.Core.Time;

/* Pause-aware: freezes at 0 when paused, scales with the active time scale. */
float dt = ScyllaTime.Instance.DeltaTime;

/* Pause and slow-motion through one knob. */
ScyllaTime.Instance.Pause();
ScyllaTime.Instance.Resume();
ScyllaTime.Instance.SetSlowMotion(scale: 0.3f);
That is the day-one surface. When you are ready to go deeper, here is where to look:
- To familiarize yourself with Scylla’s modular system, see Module System.
- To tune values from the Inspector and let players override them via JSON, see Configuration.
- For the full logging, time, and event surfaces, see Logging, Time, and Event System.
- For the data structures Core ships (queues, pools, spatial trees, graphs, grids), start with the Collections Overview and branch into Spatial Structures, Graph, and Grid.
- For the utility library, browse the Core utils: Math and Numbers, Random, Noise, Tween, Serialization, and the rest under Core / Utilities.
Troubleshooting
A few things commonly trip up a first install. Each has a quick fix.