
Where you author ColorGradientAssets with an independent alpha rail, per-stop easing and blend modes, non-destructive stop reduction, and a bake step that turns the result into a texture for shaders and VFX.
The Gradient tab is Chroma’s editor for
ColorGradientAssetfiles. A preview bar with draggable stop handles, an alpha bar that appears as soon as any alpha stops exist, a Stop Inspector below for whichever stop is selected, a non-destructive Reduction slider, and an Actions menu that bundles Optimize, Space Evenly, Invert, palette conversion, import / export, and a Bake-to-texture dialog.
Summary
The Gradient tab is where Scylla ColorGradientAsset files get built. A preview bar at the top shows the current gradient; the color stops sit on the bar’s handle row directly below the preview, and when the gradient carries any alpha stops a second bar appears beneath the first with its own handles for the alpha curve. Below the bars sits the Stop Inspector with the editable fields for whichever stop is currently selected, a Reduction slider for trimming visually-redundant stops without losing data, and an Actions toolbar that consolidates Optimize, Space Evenly, Invert, To Palette, Import, Export, and Bake into one menu.
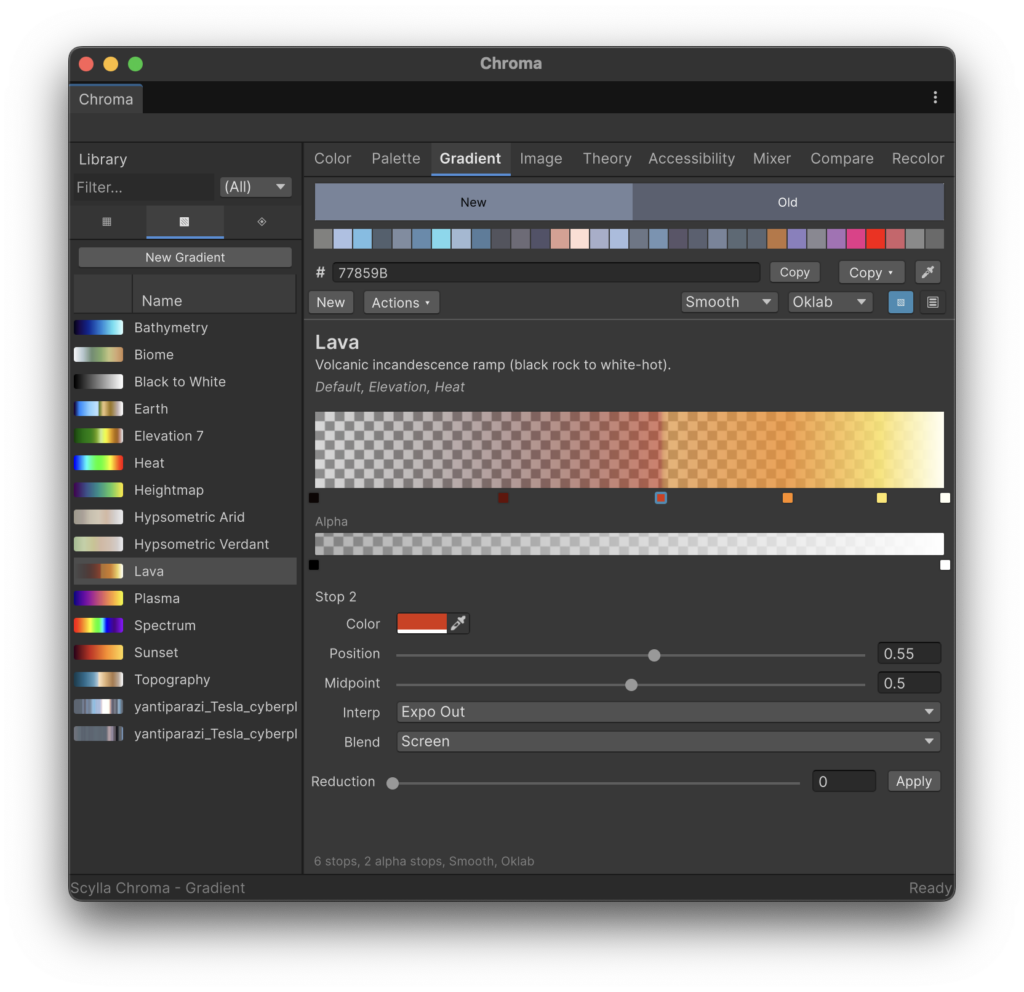
Each stop carries its own interpolation curve (None, SmoothStep, SmootherStep, or any of the 15 Penner easings), and each color stop carries its own blend mode (Normal, Multiply, Screen, or Add) so a single gradient can shift behaviour mid-curve. The blend math itself runs in one of three color spaces (RGB, HSV (Hue Saturation Value), or Oklab (a perceptually uniform color space)); HSV picks the shortest hue arc, and Oklab keeps midpoints perceptually centred so red-to-green doesn’t collapse into mud. Smooth mode interpolates continuously; Stepped mode non-destructively resamples the smooth result into flat bands without touching the underlying stops.
Unity’s built-in Gradient covers the simple cases, but it has no independent alpha curve, no per-segment easing, no per-stop blend modes, and only an RGB-ish blend space. Chroma’s tab is the answer when a project needs any of those: a fire ramp with a Screen-blended hot tail, a sky strip whose alpha fades without touching color, an Oklab-uniform LUT (Lookup Table) for shader sampling. The result can be saved back to the asset for the runtime to evaluate directly, or rasterised to a Texture2D of any size up to 4096×4096 via the Bake dialog, in PNG, TGA, or EXR, in sRGB (standard Red Green Blue) or linear-light.
- Build a gradient by double-clicking the bar to add stops, dragging swatches from the Palette tab or Library sidebar to insert them, then editing each stop’s fields in the Stop Inspector.
- Toggle between Smooth and Stepped freely; both produce the same on-disk asset and each remembers its own Reduction value.
- Pick per-stop interpolation (any of the 18 curves) and per-color-stop blend mode (Normal / Multiply / Screen / Add) for ramps the built-in
Gradientcannot express. - Bake the result to a
Texture2Dof arbitrary size and format for use as a LUT, a ramp, a sky strip, a UI asset, or any other consumer that wants a static color texture.
Features
- Independent color and alpha rails. Color stops live on the main preview bar; an alpha bar appears below it the moment the gradient carries any alpha stops, with its own handles. The two curves are fully independent: alpha stops have their own count, positions, and interpolation, and the alpha bar stays hidden for fully-opaque gradients.
- 18 per-stop interpolation curves. Each stop carries an interpolation curve applied to the segment ending at that stop: None (straight-line), SmoothStep (Hermite
3t^2 - 2t^3), SmootherStep (Perlin’s quintic6t^5 - 15t^4 + 10t^3), plus the Penner family in three variants each (In / Out / InOut): Quad, Cubic, Quart, Sine, Expo. Alpha stops use the same enum. - Four per-color-stop blend modes. Each color stop carries a blend mode applied to its segment: Normal (plain interpolation), Multiply (channelwise product, darker midtones; the lava-ramp shape), Screen (
1 - (1-a)*(1-b), brighter washed-out midtones for glow and bloom tails), Add (min(1, a+b), the brightest mixture; useful for HDR (High Dynamic Range) and blackbody ramps). The endpoints are always exact, so a Multiply segment between pure red and pure blue still ends at red and blue even thoughred * blueis black. - Three color spaces for the blend math. RGB is fastest. HSV uses shortest-hue interpolation, so red-to-green walks through yellow rather than gray. Oklab is perceptually uniform, so the midpoint of red-to-green looks halfway. Alpha is interpolated linearly regardless.
- Smooth or Stepped mode. Smooth interpolates continuously between bracketing stops. Stepped non-destructively resamples the smooth curve at band midpoints to produce flat bands. Switching modes never modifies stop data, and each mode remembers its own Reduction value.
- Non-destructive Reduction slider with Apply. In Smooth mode, the slider walks the stops by Oklab delta-E and mutes the visually redundant ones (no data loss; sliding back unmutes them); the Apply button removes the muted stops for good. In Stepped mode, the slider controls the runtime band count instead, and the Apply button is hidden because there’s nothing to apply.
- Three cleanup actions. Optimize removes stops whose value matches both neighbours (preserving stops that differ in midpoint, blend mode, or interpolation). Space Evenly redistributes both rails to uniform offsets across [0, 1]. Invert mirrors every stop around offset 0.5. Each action is a single Undo step.
- Gradient-to-Palette conversion. Actions > To Palette creates a new
ColorPaletteAssetby sampling the gradient. Choose One Color per Stop to preserve the existing stop colors exactly, or one of 4 / 8 / 16 / 32 / 64 / 128 / 256 Colors for evenly-spaced sampling. - Per-stop midpoint. Each stop carries a Midpoint value in [0.01, 0.99] that shifts the blend balance between this stop and the next. Edit it via the Midpoint field in the Stop Inspector or the Midpoint column in the list view. Midpoint is a per-stop value, not a separate handle on the bar.
- Stop Inspector below the bar. Selecting a stop populates the inspector with its editable fields. Color stops show Position, Color, Name, Interpolation, Midpoint, and Blend Mode. Alpha stops show Position, Alpha, Midpoint, and Interpolation. The Blend Mode row is hidden for alpha stops because transparency compositing is unambiguous.
- Dense gradient list view. A toggleable tabular view of every stop with Position, Color, Name, Interpolation, and Midpoint columns. Above 256 stops on a rail, the bar’s per-stop handle rendering is suppressed for performance (the preview ramp still draws correctly), and the list view becomes the editing surface.
- Bake dialog. Actions > Bake… opens a dedicated
EditorWindowthat rasterises the gradient into aTexture2Dasset. Width and Height each pick from {1, 8, 16, 32, 64, 128, 256, 512, 1024, 2048, 4096}; Height can also be Same as width for square LUT textures. Orientation is Horizontal or Vertical, format is PNG, TGA, or EXR, and the Linear Color Space toggle controls whether the rasterised pixels land in sRGB or linear-light. - Drag swatches onto the bar. Drag any swatch from the Palette Editor or the Library sidebar onto the gradient bar and a new color stop is inserted at the drop position with that exact color. Drop a whole palette (multiple swatches at once) and the entire set is inserted across the drop region.
- Asset-level Undo / Redo. Cmd/Ctrl+Z / Y immediately refreshes the bar, the list view, and the Stop Inspector to match the asset state. The panel subscribes to
Undo.undoRedoPerformed, so the refresh fires from any Undo source, not just keyboard ones.
Recipes
These recipes cover the full authoring workflow for gradient assets. Each one is self-contained – you don’t have to read them in order. Jump to the one that matches what you’re working on right now.
Create or load a gradient asset
Problem. You need a gradient to work with, either a fresh one to build from scratch or an existing asset to continue editing.
Solution. Click New in the Gradient toolbar to create a fresh ColorGradientAsset under the configured gradient directory (default Assets/Scylla/Resources/Color/Gradients/, configurable under Project Settings > Scylla; see Preferences). The new gradient opens with two stops: black at offset 0 and white at offset 1. The new asset is selected in the library sidebar’s Gradients sub-tab and the first stop is auto-selected so the Stop Inspector reflects it.
To load an existing gradient, click any entry in the library sidebar’s Gradients sub-tab, or drag a ColorGradientAsset from the Project window onto the Gradient tab. The active gradient is persisted via its GUID (Globally Unique Identifier), so reopening the window restores it automatically.
Shift+Click on New unloads the active gradient without creating a new one. The bar empties and the Stop Inspector hides until another asset is loaded.
Build a heat ramp from scratch
Problem. You want to build a multi-stop color ramp, for example a fire or heat ramp that transitions through deep reds, oranges, and yellows, starting from nothing.
Solution. Start with a new gradient (two stops: black and white). Then:
- Click the white stop at offset 1 and change its color in the Stop Inspector to the hottest color in your ramp (for a fire ramp, a bright warm yellow).
- Click the black stop at offset 0 and change it to the coolest color (deep dark red, or black for a glow-from-nothing effect).
- Double-click the bar at the offset where you want to add an intermediate stop. The new stop is inserted at that position with its color sampled from the current gradient so the preview doesn’t visibly jump on insert. The new stop is auto-selected.
- Change the new stop’s color in the Stop Inspector (for a fire ramp, a saturated orange around offset 0.4).
- Repeat double-click and color edit for as many stops as the ramp needs.
- Adjust each stop’s Position field in the Stop Inspector for fine offset control; the bar handles are not horizontally draggable.
For a ramp that will drive a shader, set the Color Space dropdown to Oklab so the midpoints stay perceptually even. For a ramp where hue variety matters (rainbow effects), HSV is the better pick.
Edit color and alpha stops independently
Problem. You want a multi-color ramp that also has a custom transparency curve, for example a fire gradient that fades in quickly at the base and holds full opacity through its useful range, without any of the alpha positions needing to match the color stop positions.
Solution. Color stops and alpha stops live on separate rails and can have different counts, positions, and interpolation modes.
To add alpha stops:
- Double-click on the alpha bar, which sits below the main color bar. If the gradient has no alpha stops yet, the bar isn’t visible – double-click the area just below the color bar’s handle row and the first alpha stop appears, bringing the bar into view. The new alpha stop defaults to alpha 1.
- Set the actual alpha value via the Alpha field in the Stop Inspector.
- Double-click the alpha bar at additional positions to add more stops.
To delete an alpha stop, drag its handle vertically off the bar, or select it and press Delete / Backspace.
The alpha rail is fully independent: three color stops and a two-stop alpha curve (zero at offset 0, one at offset 0.1, holding to offset 1) is a completely valid gradient. None of the alpha stop positions need to coincide with any color stop.
For gradients that are fully opaque throughout, leave the alpha rail empty (no alpha stops, alpha implicitly 1 everywhere). The alpha bar stays hidden in that case.
Shape a segment with interpolation and midpoint
Problem. A straight linear blend between two stops looks mechanical, and you want to give a segment a more organic feel – ease in slowly, or push most of the transition into the first half of the range.
Solution. Each stop carries two per-segment controls in the Stop Inspector:
- Interpolation. The 18 available curves are: None (straight-line), SmoothStep (Hermite S-curve), SmootherStep (Perlin’s quintic, smoother than SmoothStep), and the Penner family in In / Out / InOut variants: Quad, Cubic, Quart, Sine, Expo. The interpolation on stop N controls the segment ending at stop N, so the transition from stop N-1 to stop N uses stop N’s curve.
- Midpoint. A value in [0.01, 0.99] that shifts the blend balance between this stop and the next. 0.5 (default) puts the transition midpoint halfway between the two offsets. 0.25 compresses the transition into the left quarter of the segment. 0.75 does the opposite. You can edit it in the Stop Inspector’s Midpoint field or in the Midpoint column of the list view (which uses delayed-commit so typing doesn’t trigger mid-keystroke re-sorts).
A SineInOut interpolation with a midpoint of 0.3 puts most of the color transition in the first third of the segment, producing a fast snap followed by a slow drift – useful for the kind of highlight roll-off you find on metallic surfaces.
Apply a blend mode for Screen and Multiply midpoints
Problem. You want a gradient segment where the midpoint doesn’t blend by averaging the two endpoint colors – for example a fire gradient with an Add-blended hot tail that pushes toward white at the center rather than averaging red and yellow.
Solution. Each color stop carries a Blend Mode dropdown in the Stop Inspector. The available modes are:
- Normal. Straight-line interpolation between endpoint colors. The default.
- Multiply. Channelwise product
a * b. Produces darker, more saturated midtones. Good for lava ramps and dye-style color mixing. - Screen. Inverse multiply
1 - (1-a) * (1-b). Produces brighter, washed-out midtones. Good for glow and bloom hot tails. - Add. Clamped sum
min(1, a + b). Pushes the midpoint toward the brightest mixture. Good for HDR and blackbody ramps where the midtone should glow rather than stay perceptually between the two endpoints.
The blend is applied via a bell-displaced lerp so the endpoints stay exact: a Multiply segment between pure red and pure blue still ends exactly at red and blue even though red * blue is black. The bell peaks at the segment midpoint and returns to zero at both endpoints.
The Blend Mode row is hidden for alpha stops; transparency compositing doesn’t use blend modes.
Switch between Smooth and Stepped mode
Problem. You want to produce a flat-banded stepped gradient from the same stop data you’ve already set up, without duplicating the asset or permanently changing the stops.
Solution. The Mode dropdown in the toolbar (right side, next to the color space picker) switches between Smooth and Stepped. Both modes read the same underlying stops and switching never modifies stop data.
In Stepped mode the Reduction slider drives the band count rather than stop muting. Slider 0 produces the maximum band count; slider 1 produces one band per active color stop. The Apply button disappears in Stepped mode because there’s nothing to collapse.
In Smooth mode the Reduction slider mutes stops by Oklab delta-E proximity. The Apply button is visible and removes muted stops permanently when clicked.
The two slider values are stored independently on the asset: toggling from Smooth to Stepped and back does not clobber the Smooth Reduction value you had set.
Reduce a gradient’s stop count non-destructively
Problem. You captured or imported a gradient with hundreds of stops (from the Image Sampler, or from a high-density Photoshop GRD (Photoshop Gradient format) file) and want to simplify it down to a manageable number without losing the visual character.
Solution. With the gradient in Smooth mode, drag the Reduction slider from 0 toward 1. Chroma walks the stops by Oklab delta-E (perceptual color distance) and mutes any stop whose distance from the previous kept stop falls below an interpolated threshold. Muted stops appear at reduced opacity on the bar and show (muted) in italic text in the list view. The gradient preview skips muted stops in its evaluation.
The muting is fully reversible: slide back toward 0 and the muted stops reappear. Try different Reduction values until the preview still looks right to you.
When you’re satisfied, click Apply. A confirmation dialog warns that the action cannot be undone. Clicking Apply permanently removes all currently-muted stops, resets the slider to 0, and rebuilds the bar.
Clean up a gradient with Optimize, Space Evenly, or Invert
Problem. After a round of editing you have stops that are technically redundant, unevenly spaced, or you just want to flip the gradient direction.
Solution. All three cleanup actions live in the Actions menu and are each a single Undo step:
- Optimize. Removes color stops whose Color, Interpolation, Midpoint, IsMuted, and BlendMode all match both immediate neighbours. Alpha stops are checked against their neighbours on Alpha, Midpoint, and Interpolation. A stop with a different blend mode or midpoint from its neighbours is kept even if its color matches; Optimize treats the per-segment metadata as part of the stop’s identity. The status bar reports how many stops were removed per rail, or “No redundant stops found” when nothing was changed.
- Space Evenly. Redistributes both color and alpha stops to uniform offsets across [0, 1], preserving the visual left-to-right order. With n stops on a rail, the k-th stop in offset order receives offset
k / (n - 1); the first and last become 0 and 1. The two rails are spaced independently. Disabled when fewer than two color stops exist. - Invert. Mirrors every color and alpha stop around offset 0.5 so the gradient runs in the opposite direction. Stop colors, names, interpolation, midpoints, blend modes, and mute flags are preserved on each stop; only the offsets change. Same minimum-count gating as Space Evenly.
Convert a gradient into a palette
Problem. You built a ramp with carefully chosen stop colors and now want a ColorPaletteAsset that gives you those same colors as discrete swatches you can reuse in the Palette Editor.
Solution. Click Actions > To Palette and choose one of:
- One Color per Stop. Creates a palette with exactly one swatch per color stop, in offset order, using each stop’s color. Names default to the stop names, or auto-generated nearest-named-color labels when stop names are blank. Use this when the gradient was built from a known palette and you want to recover it exactly.
- 4 / 8 / 16 / 32 / 64 / 128 / 256 Colors. Samples the gradient at the chosen number of evenly-spaced positions. The samples honour the active interpolation, midpoint, blend mode, and color space, so the resulting palette is what the gradient evaluates to at those positions, not just the raw stop colors.
The new palette lands under the configured palette directory (default Assets/Scylla/Resources/Color/Palettes/), opens in the Palette Editor, and is selected in the library sidebar’s Palettes sub-tab in one flow.
Bake the gradient to a texture
Problem. You want to use the gradient as a ramp sampler in a shader or a VFX graph – which means you need a Texture2D asset, not a runtime ColorGradientAsset.
Solution. Click Actions > Bake… to open the Bake dialog, a non-resizable utility EditorWindow with five fields:
- Width. Dropdown: 1, 8, 16, 32, 64, 128, 256, 512, 1024, 2048, 4096.
- Height. Dropdown: Same as width (resolves to whatever Width is set to at bake time, producing square LUT textures), or any of 1, 8, 16, 32, 64, 128, 256, 512, 1024, 2048, 4096.
- Orientation. Horizontal (default; gradient runs left-to-right) or Vertical (top-to-bottom).
- Format. PNG (the standard choice for LUTs and ramps), TGA (preserves alpha cleanly with no compression artefacts), EXR (HDR-safe, the right choice when the gradient uses Screen or Add blend modes that may push values above 1).
- Linear Color Space. Toggle. Off (the default), the gradient is rasterised in sRGB. On, the rasterised pixels land in linear-light space, which is what shaders consume natively. Turn this on for ramps that drive shader inputs; leave it off for textures that show up in UI or get sampled as albedo.
First-run defaults are Width 256, Height 16, Orientation Horizontal, Format PNG, Linear Color Space off. All five values persist across invocations under EditorPrefs and are cleared by the Chroma window’s Reset menu action.
Clicking Bake opens a Save As panel constrained to the project. Cancelling Save As keeps the dialog open with current values intact so the bake can be retried. The created asset is a regular Texture2D that Unity treats like any other texture import; configure its filter and wrap modes in the Inspector as needed.
Use the dense list view for high-stop-count gradients
Problem. You imported a gradient with hundreds or thousands of stops (a long Image Sampler trace, for instance) and the bar has no per-stop handles to click.
Solution. Above 256 stops on either rail, Chroma suppresses handle rendering on the bar entirely to keep the editor responsive. The preview ramp still draws the full gradient, but editing moves to the list view.
Click the list-view button in the toolbar (the icon to the right of the editor-view button) to switch. The view shows a MultiColumnListView with Position, Color, Name, Interpolation, and Midpoint columns. Position and Midpoint fields use delayed-commit semantics: values commit only on Enter, Tab, or focus-loss, not on every keystroke. After a Position edit re-sorts the rows, keyboard focus follows the moved row to its new index so the next edit lands on the same stop.
Muted rows (under non-zero Smooth-mode Reduction) show (muted) in italic dim text in the Name column.
The 256-stop handle threshold is a UI guard, not a stop-count cap. Gradients can have thousands of stops.
Import a Photoshop GRD gradient
Problem. You have a .grd file exported from Photoshop and want to bring one or more of its gradients into your project as ColorGradientAsset files.
Solution. Click Actions > Import > Photoshop Gradient (.grd) and select your file. Chroma’s GRD (Photoshop Gradient format) importer reads both GRD3 (legacy, Photoshop 6/7) and GRD5 (modern, Photoshop CS+) format variants.
If the file contains more than one gradient, a picker window opens so you can choose which gradients to import. Each selected gradient becomes a separate ColorGradientAsset. Imported gradients start in Smooth mode with RGB color space. The description field is set to “Imported from <filename>“.
A few things to know about the import:
- Noise gradients (Photoshop’s procedural noise-gradient type) are skipped with a Unity console warning. A file that contains only noise gradients will not produce any assets.
- Foreground/background sentinels (stops tagged as Photoshop’s live foreground or background color) are substituted with black and white respectively, since Chroma has no live FG/BG color concept.
- Fully opaque alpha tracks are dropped automatically. If every alpha stop in a gradient has alpha >= 1, the alpha rail is omitted so the Chroma editor doesn’t show a redundant transparency rail.
- Color space conversion: CMYK (Cyan Magenta Yellow Key) and Lab stops are converted to RGB at import time without an ICC (International Color Consortium) profile. Results may drift slightly from Photoshop’s own rendering; this matches the approach used by other open-source tools like Krita.
For the full format matrix including round-trip fidelity and multi-gradient library behaviour, see the Import and Export page.
Tips and pitfalls
- The interpolation curve applies to the segment ending at the stop. Setting CubicIn on the second stop affects the transition from the first stop to the second, not from the second to the third. To shape the entire gradient with one curve, set the same interpolation on every stop except the first.
- Blend modes apply per color stop, not per gradient. A gradient can have one segment with Multiply and the next with Screen. The bell-displaced lerp keeps each endpoint exact, so a Multiply segment between red and blue still ends at red and blue even though
red * blueis black. - Smooth Reduction and Stepped Reduction are independent values on the asset. Toggling Mode doesn’t clobber the inactive slider’s persisted value. Sliding the Smooth Reduction to 0.5 to mute six stops and then switching to Stepped leaves those six stops muted (so the Stepped active set excludes them) but resets the visible slider to whatever value Stepped Reduction was at last.
- Apply in Smooth mode is the only destructive Reduction action. Sliding the Reduction slider mutes stops non-destructively; sliding back unmutes them. Only the Apply button physically removes muted stops, and only it warns about the irreversibility. Reduction itself is fully reversible.
- The Apply button is hidden in Stepped mode. Stepped reduction never modifies stop data; the slider only changes how many bands the runtime samples. There’s nothing to apply, so the button is not shown.
- Linear Color Space in the Bake dialog matters most for shader-input textures. A gradient baked in sRGB and sampled in a shader (which expects linear-light input) will be slightly darker than the same gradient baked linear. For LUTs and ramps consumed by shaders, leave the toggle on; for UI textures sampled by
CanvasRendererand other sRGB-aware code, leave it off. - The 256-stop handle threshold is a UI guard, not a stop-count cap. Gradients can have thousands of stops (Image Sampler traces produce 1024+ stops easily). Above 256, the bar shows the preview ramp but hides per-stop handles; edits happen via the list view.
- Stepped mode samples the active stop set. Muting color stops in Smooth and then switching to Stepped uses the active (non-muted) stops as the band-count reference. That’s intentional, so Reduction and Stepped band-count can be tuned together.
- Alpha is always linear. Alpha is a compositing weight, not a color value, and the perceptual color-space settings (Oklab, HSV) don’t apply to it. An alpha curve with a strong Penner ease will produce a perceptually-correct fade because the ease is applied to the linear
t, not because alpha is in any color space. - Optimize respects per-segment intent. A stop with the same color as both neighbours but a different midpoint, blend mode, or interpolation is not removed; the action treats the metadata as part of the stop’s identity. Optimize is safe to run after a manual cleanup pass; it won’t collapse intentionally-redundant-but-differently-styled stops.
- The color rail has a two-stop minimum. Delete / Backspace and drag-off-rail both refuse to drop the color stop count below two; the bar always retains at least one segment.
Keyboard shortcuts
| Key | Action |
|---|---|
| Double-click on the bar | Insert a new color stop (on the main bar) or alpha stop (on the alpha bar) at the cursor offset, auto-selected. |
| Drag stop handle vertically off the rail | Delete the stop. The threshold is about 40 pixels above or below the handle’s resting line. |
| Delete / Backspace | Remove the currently selected stop. Ignored while a text or number field is being edited, so typing isn’t interrupted. |
| Enter / Tab (in Name, Description, Tags text fields) | Commit the field’s edited value (also fires on focus-loss). |
| Escape (in Name, Description, Tags text fields) | Revert the field’s value to the pre-edit state. |
| Cmd/Ctrl+Z / Y | Undo / Redo, refreshes the bar, list view, and Stop Inspector immediately. |
Stop positions are edited via the Position field in the Stop Inspector or the Position column in the list view (which uses delayed-commit semantics, so values commit only on Enter / Tab / focus-loss). The bar handles do not support horizontal dragging; that’s intentional, mirroring Photoshop’s gradient editor.