
Where you pull colors out of a loaded image, whether you want a single pixel, a region average, a gradient traced across a photo, or a full dominant-color palette extracted automatically from a screenshot.
The Image tab is Chroma’s color-from-pixels workspace. Load any texture (drag from Project window, browse from disk, or paste from clipboard), then either pick colors interactively in one of four sampling modes or run an automated extraction with one of four algorithms. The sampling modes produce either a single color, a single rectangle average, or a brand-new gradient asset; the extract algorithms produce a brand-new palette asset.
Summary
The fastest way to capture a color palette that already exists somewhere is to sample it from a screenshot. A piece of concept art, a movie still, a photograph, a competitor’s title screen, a noisy reference texture: there is usually an image holding the colors a project needs, and the work is just getting them out.
The Image tab handles this two ways. The four sampling modes (Point, Average, Gradient, Trace) are interactive: click or drag on the image and the captured color or color sequence is the result. Point is the obvious “pick this exact pixel” case; Average answers “what color is this region on the whole”; Gradient captures the color path as the cursor moves across pixels; Trace captures it as elapsed time, so dwelling on a region produces a wide solid band. The four extraction algorithms are non-interactive: pick an algorithm, set a count, click Extract, and Chroma analyses the whole texture and produces a palette of dominant colors.
- Sample a single color from a screenshot with Point mode plus the magnifier overlay; arrow-key nudge a virtual cursor for pixel-precise picks.
- Capture the average color of a region (background, character clothing, sky) with Average mode.
- Trace a color path across an image with Gradient mode (motion-gated, uniform stop offsets) or Trace mode (time-gated, dwell becomes width) to build a gradient asset from photographic reference.
- Extract a palette from an entire image automatically with K-Means (Oklab (a perceptual color space) perceptual clusters), Median Cut (classic Heckbert RGB-cube subdivision), Luminance Buckets (shadow/mid/highlight grouping), or Most Saturated (top-N vivid hues with hue deduplication).
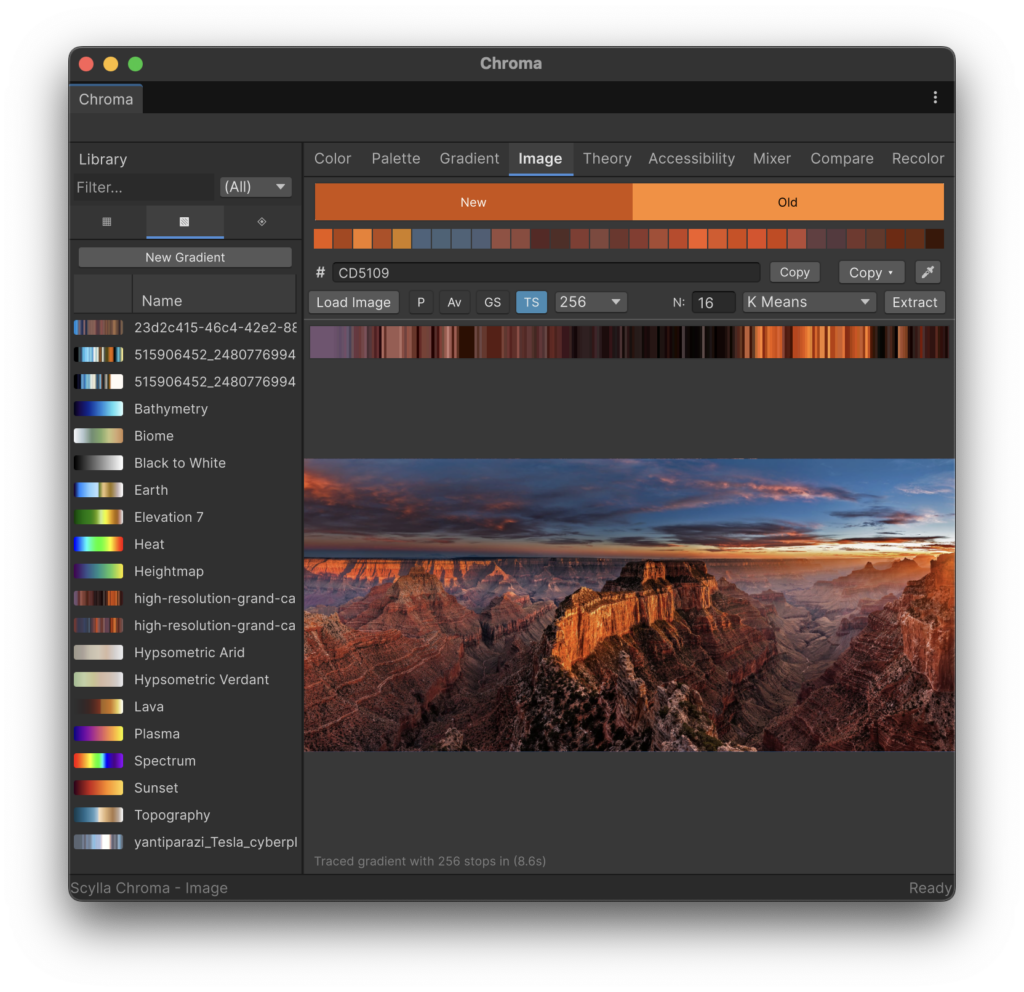
Features
- Three load paths. Drag a
Texture2Dfrom the Project window onto the image area, click Load Image in the toolbar for an OS file picker (project-relative paths resolve viaAssetDatabase; external paths load viaTexture2D.LoadImage), or paste an image from the system clipboard. - Four sampling modes. Toolbar buttons labelled P (Point), Av (Average), GS (Gradient), TS (Trace). Mutually exclusive; the active mode persists across window opens.
- Point mode. Single-pixel click. A 96-pixel magnifier overlay floats next to the cursor showing an 8x point-filtered zoom with a crosshair on the exact sample pixel. Arrow keys nudge a virtual cursor pixel-by-pixel for fine adjustments.
- Average mode. Click and drag a rectangle on the image; the result is the rectangle’s average color computed in sRGB space.
- Gradient mode. Press and hold the mouse, drag the cursor across the image. One sample per distinct texture pixel (motion-gated). Stop offsets are uniformly spaced in the output gradient (
t = i / (n - 1)). Hard-clamps at the max-stops popup value; once the buffer is full no further samples are accepted. Path overlay is a white polyline. Finalises into a newColorGradientAsseton mouse-release. - Trace mode. Press and hold the mouse, drag or stay still. One sample per editor tick (~30 Hz) regardless of motion. Stop offsets are derived from elapsed seconds since trace-start, so dwelling on a region produces repeated samples that read as a wide solid band in the output gradient. Hard-clamps at the max-stops popup value. Path overlay is an orange polyline (visually distinct from Gradient mode). Finalises into a new
ColorGradientAsseton mouse-release with explicit anchors at the press and release positions. - Max-stops popup. Shared between Gradient and Trace modes. Choices: 16 / 32 / 64 / 128 / 256 / 512 / 1024 / 2048 / 4096. Default 64. Values above 256 produce dense ramps best edited via the Gradient tab’s list view (the gradient bar suppresses per-stop handle rendering above that threshold).
- Live preview bar. Above the image, a strip that fills with the captured colors in real time as Gradient or Trace mode emits samples. Disappears in Point and Average modes.
- Magnifier overlay. 96-pixel window beside the cursor showing an 8x point-filtered zoom with crosshair on the sample pixel. Always present in Point mode; available in the other modes too as the cursor moves.
- Arrow-key nudging. With the image loaded and a sample point active, arrow keys move a virtual cursor pixel-by-pixel for precise sampling without the mouse.
- Four extract strategies. Dropdown next to the Extract button: K-Means (Oklab perceptual clusters), Median Cut (RGB color-cube subdivision), Luminance Buckets (shadow / mid / highlight grouping in Oklab), Most Saturated (top-N vivid hues with hue deduplication in HSV).
- Extract count. Numeric field on the toolbar, range 1 – 256, default 16. The number of colors the chosen strategy will produce.
- Extract button. Runs the selected strategy on the whole loaded image (independent of the active sampling mode) and creates a new
ColorPaletteAssetwith the result. Each entry is auto-named via your default named-color database (see Preferences). - Auto-open of extracted palettes. The new palette is selected in the library sidebar’s Palettes sub-tab and opened in the Palette Editor, so the Image tab itself stays clean without a result swatch strip beneath the image.
- GPU downsampling. All four extraction strategies downsample the source texture before processing via a GPU blit path that does not require Read/Write enabled on the source. Keeps extraction wall-clock time bounded on large inputs. K-Means, Median Cut, and Most Saturated use a 128-pixel long axis; Luminance Buckets uses 256 pixels (its algorithm is O(n) so the extra pixels have negligible cost).
- Asset bound rather than screen bound. Sampling reads from the texture loaded into the panel, not from arbitrary OS-level desktop pixels. The output gradient and palette are fully reproducible from the source texture; for desktop-pixel picking, see the eyedropper in the Color Editor.
Recipes
Each recipe here is self-contained – jump to whichever matches what you are trying to do. The first one covers loading an image, which the others all assume you have already done.
Load an image into the sampler
Problem. You have a screenshot, a piece of concept art, or a reference photo on disk (or already imported as a Unity texture), and you want to pull colors out of it using the Image tab.
Solution. Open Chroma and switch to the Image tab. You have three ways to get the image in:
- Click Load Image in the toolbar. A file picker opens; navigate to your image file. Project-relative paths (inside your
Assetsfolder) load viaAssetDatabase, so the texture uses whatever import settings you have already applied. External files load viaTexture2D.LoadImagefrom raw bytes on disk. - Drag a
Texture2Ddirectly from the Project window onto the image area. The empty-state label spells out the gesture: “No image loaded. Drag a Texture2D from the Project window, or click Load Image.” - Paste from clipboard when the source application supports image clipboard data.
When the image loads, the empty-state label disappears, the toolbar mode buttons activate, and the image fills the panel area with letterboxing or pillarboxing to preserve the aspect ratio.
Pick a single pixel from a reference image
Problem. You want the exact color of a specific pixel in a reference image – the bright cyan of a particular neon sign, the muted gold of an NPC’s shield, the precise skin tone of a character sheet. You need it matched exactly, not eyeballed.
Solution. Click P in the toolbar to switch to Point mode. Move the cursor over the image. A 96-pixel magnifier overlay floats next to the cursor showing an 8x point-filtered zoom with a crosshair marking the exact pixel that will be sampled on click. When the crosshair is on the pixel you want, click. The pixel’s color becomes the active color, propagating to the Color Editor, the preview strip, the history strip, and every other tab in the window.
For pixel-precise positioning without relying on hand-eye coordination, use the arrow keys. The virtual cursor nudges one texture pixel per key press. The magnifier follows the virtual cursor, so you can park the cursor on roughly the right spot with the mouse and then fine-tune with the arrow keys until the crosshair is exactly where you want it. Press Space, Enter, or Keypad Enter to sample the pixel at the current virtual cursor position without moving the mouse.
Average the color of a region
Problem. You want the representative color of a region in a photo – the overall hue of a character’s jacket, the average tone of a sky gradient, the tint of a background environment. A single pixel is too noisy; you want the blend.
Solution. Click Av in the toolbar to switch to Average mode. Click and drag a rectangle on the image. The selection rectangle is visible during the drag. On mouse-release, Chroma computes the average sRGB color of all pixels inside the rectangle and sets it as the active color.
The average is computed in sRGB space (the same space the pixels are stored in). This matches what you see on screen and is the right choice for most art-direction decisions: tint colors, mood-board references, UI background hints, and “what does this region look like overall” questions.
Trace a color path across an image in Gradient mode
Problem. You want to extract the colors along a specific route across an image – the progression from dark wood to bright highlight along a weapon’s blade, the shift from shadow through midtone to rim light on a character’s face – and turn that sequence into a gradient asset you can use for cel shading, lighting gradients, or material tint ramps.
Solution. Click GS in the toolbar to switch to Gradient mode. Set the Max Stops popup to the ceiling you want (16 / 32 / 64 / 128 / 256 / 512 / 1024 / 2048 / 4096; default 64). Press and hold the mouse on the image, then drag across the colors you want to capture.
Gradient mode is motion-gated: one sample is captured each time the cursor moves to a different texture pixel. Holding the cursor still emits no new samples. A white polyline overlay shows the path your cursor took, and the live preview bar above the image fills with the captured colors in real time.
Stop offsets in the finalised gradient are uniformly spaced (t = i / (n - 1)), so a 30-sample drag produces stops at offsets 0, 1/29, 2/29, …, 1. The spatial distribution of your cursor path is not preserved – fast and slow segments end up with the same stop density. If you want dwell-aware sampling (slow or stationary movement reading as wider gradient bands), use Trace mode instead.
Once the buffer reaches the Max Stops cap, no further samples are accepted even if the cursor keeps moving. The preview bar stays full, signalling that the cap is reached. Release the mouse to finalise. Chroma creates a new ColorGradientAsset (named after the source texture, description Sampled from <texture-name>) in the configured gradient directory and opens it in the Gradient Editor.
Trace a dwell-aware gradient in Trace mode
Problem. You want a gradient that reflects how long you paused on each color in the image – the part of the fire you lingered on reads as a wide orange band; the quick sweep through blue reads as a narrow sliver. Gradient mode gives you equal spacing regardless; you want time-proportional spacing.
Solution. Click TS in the toolbar to switch to Trace mode. Set Max Stops to your desired ceiling. Press and hold the mouse, then move (or stay still) along the colors to capture.
Trace mode is time-gated: one sample per editor tick (at a ~30 Hz rate) regardless of cursor motion. Holding the cursor still produces repeated samples of the same color, so a dwell on a region reads as a wide solid band in the output gradient. Stop offsets are derived from elapsed seconds since the trace started:
t[i] = traceTimes[i] / traceTimes[last]
A trace that spent 0.5 seconds on red and 1.5 seconds on blue ends up with the red samples in roughly the first quarter of the gradient and the blue samples in the remaining three-quarters. The orange polyline overlay (visually distinct from Gradient mode’s white) shows your cursor path, and the preview bar fills as ticks produce new samples.
Chroma force-emits a closing stop at the release position so the gradient always begins at your press point and ends at your release point. The finalised asset is named after the source texture with description Traced from <texture-name>.
Extract a dominant-color palette from an entire image
Problem. You have a screenshot or piece of concept art and you want Chroma to automatically produce a palette of its dominant colors – the kind of palette that summarises what the image is “about” chromatically. You will then refine it in the Palette Editor.
Solution. With an image loaded, set the N field to the desired color count (1-256, default 16), pick a strategy from the dropdown next to Extract, and click Extract. The pipeline runs on the entire image regardless of which sampling mode is active.
The four strategies are:
- K-Means (Oklab). Cluster centroids in the Oklab perceptual color space (a modern uniform color space where equal Euclidean distances correspond to similar perceived differences), refined through alternating assignment and update steps until the maximum centroid movement falls below an imperceptible threshold or 20 iterations are reached. Returns colors sorted by pixel coverage, most dominant first. The right choice when “what colors does this image use, in proportion” is the question.
- Median Cut (RGB). The classic Heckbert reduction: recursively split the pixel cloud along the RGB channel with the largest range, partition by median, repeat until N buckets remain. Each bucket’s color is its mean. Returns colors in unspecified order. The right choice when matching the historical behaviour of GIF / PNG palette quantisation, or when the source is a low-color indexed image (pixel art, illustrations) where the distinct colors are well-separated in RGB space.
- Luminance Buckets (Oklab). Partition pixels by Oklab perceptual lightness into N equal-width bands; each band’s representative color is the per-band average in sRGB. Returns colors sorted darkest first. The right choice for shadow / midtone / highlight palettes for cel shading, posterising, or single-tone-set artwork. A count of 3 gives you a classic shadow/midtone/highlight triplet.
- Most Saturated (HSV). Top-N pixels by HSV saturation, with hue-bucket deduplication so two nearly-identical hot pinks do not both appear. Filters out fully-transparent pixels (alpha threshold 0.05) and near-grey pixels (saturation below 0.2) and near-black pixels (value below 0.1). Returns colors sorted most vivid first. The right choice for “what are the bold accent colors in this image” rather than “what is the average color distribution”.
All four strategies downsample the source texture via a GPU blit before processing, so the source texture does not need Read/Write enabled. The new palette is auto-named, each entry is named via your default named-color database (see Preferences), and the palette opens automatically in the Palette Editor.
Combine extraction and manual sampling for a curated palette
Problem. You want a palette that is rooted in a reference image but refined by you – an Extract first cut that is too noisy or too comprehensive on its own, combined with a few hand-picked point samples of the specific colors that matter most.
Solution. There are two useful patterns here.
The first is extract-then-refine. Run K-Means at count 32 on your reference image. The resulting palette is a reasonable map of the image’s color identity. Open it in the Palette Editor, deduplicate (Actions > Remove Duplicates), sort by hue, lock the colors you want to keep, and remove the noise. You end up with a palette rooted in the source image but edited to a specific design intent.
The second is point-sample-then-collect. Switch to Point mode and click the specific pixels you care about – that particular shadow tone, the highlight that reads right, the accent that pops. Each click propagates through the history strip in the Color Editor. When you have gathered enough, switch to the Palette tab and bulk-add from the history strip. You can also view extracted and sampled colors side by side using Palette Compare to decide which ones make the final cut.
Both patterns work; the choice depends on whether you are starting from “here is everything in the image, trim it down” or “here are the specific colors I want, let me name and organise them.”
Tips and pitfalls
- The arrow-key virtual cursor only works while the image has focus. If arrow keys are not moving the cursor, hover the mouse over the image area – focus is claimed on hover.
- Gradient mode’s offsets are not spatial. A drag that moves slowly across red and then sprints across blue produces stops with equal spacing between them, not stops weighted by cursor speed. Trace mode preserves dwell as gradient width; Gradient mode does not.
- Max Stops hard-clamps, it does not scroll. Once a Gradient or Trace capture hits the max, additional motion or ticks are ignored. There is no rolling-window behaviour; older samples are never dropped to make room for newer ones.
- Trace mode produces dense gradients quickly. At 30 Hz, a 5-second trace fills 150 stops. Use Max Stops 32 or 64 for hand-painted ramps; reserve 512+ for dense reference paths intended for the Gradient tab’s list view.
- Extract count vs perceived diversity. Higher N is not always more useful. Above 32 on a photo with a narrow color palette, the additional colors tend to be subtle hue variations of the dominant ones rather than distinct new colors. Start at 8 or 16 and increase only when the result undershoots the image’s diversity.
- Median Cut works well on indexed-color sources. For pixel art, low-color illustrations, and other inputs authored as indexed palettes, Median Cut tends to recover the original palette closely. For photographic sources, K-Means produces results that feel more human-readable because of the Oklab perceptual weighting.
- Most Saturated filters out near-transparent, near-grey, and near-black pixels. A screenshot that is mostly off-white will return very few results because most pixels fall below the saturation threshold. For desaturated source material, K-Means or Luminance Buckets read better.
- The downsample step preserves dominant colors but loses small details. A 16×16 logo in the corner of a 4K screenshot may not survive the downsample. For small-region extraction, crop the source image first and run Extract on the crop.
- Extract is independent of the active sampling mode. The mode buttons (P / Av / GS / TS) do not affect Extract; the strategy dropdown and count field do. Extract always runs on the whole image.
- Pasted images do not become project assets. A paste-from-clipboard load is a
Texture2Din memory only – it has noAssetDatabasepath. Sampled colors and extracted palettes are full project assets, but the source image itself is gone the moment a new image is loaded or the panel is closed. Save the clipboard image to disk first if it needs to be retained.
Keyboard shortcuts
| Key | Action |
|---|---|
| Arrow keys | Nudge the virtual cursor by one pixel in Point mode (and in any mode where a sample point is active). |
| Space / Enter / Keypad Enter | Sample the pixel at the virtual cursor position (Point mode). |
| Click on image | Sample the pixel under the cursor (Point) or anchor the drag start (Average, Gradient, Trace). |
| Drag on image | Define the rectangle (Average), trace the path (Gradient, Trace). |
| Mouse-release on image | Commit the rectangle average (Average) or finalise into a new ColorGradientAsset (Gradient, Trace). |
| Cmd/Ctrl+Z / Y | Undo / Redo the most recent asset creation. |